Setting Up Hostname and Name Resolution
Hostname
Hostname is the name of the system used to communicate with other systems. A fully qualified domain name consists "hostname.domain.name" .
Ex: test.example.com OR prod.oracle.com
You can configure hostname in three ways.
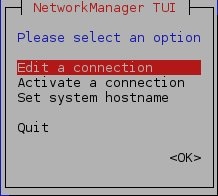
i. nmtui and select Change Hostname
ii. hostnamectl set-hostname NAME
iii. edit file /etc/hosts
i. NMTUI :
Follow the below images.
1.

2.

3.

4.

After system reboot it will show the same hostname at [root@prod singh] in terminal.
ii. hostnamectl
It will show you hostname with system architecture and Virtualization.
[root@TEST Desktop]# hostnamectl status OR hostnamectl
Static hostname: TEST.iitr.pdc
Icon name: computer-desktop
Chassis: desktop
Machine ID: 8c1a8077b3f78bd3bf956a214f3c602c
Boot ID: 831406fb20c34cceaf988188e2e180ab
Virtualization: kvm
Operating System: Oracle Linux Server 7.3
CPE OS Name: cpe:/o:oracle:linux:7:3:server
Kernel: Linux 4.1.12-514.26.2.el7uek.x86_64
Architecture: x86-64
[root@TEST Desktop]# hostnamectl set-hostname TEST2.oracle.com
[root@TEST Desktop]# hostname
test2.oracle.com
[root@TEST Desktop]#
iii. /etc/hosts: To configure hostname edit /etc/hosts file with the following settings...
[root@test2 Desktop]# vi /etc/hosts

If you have not a DNS server for local name resolution then do the entry in this file. It also works for name resolution of other systems.These are the options to change/set hostname. After hostname change must logout or reboot the system.
Network Configuration
For network configuration same as above we have 3 options.
i. nmtui
ii. nmcli
iii. edit /etc/sysconfig/network-scripts/ifcfg-eth0
i. nmtui:
[root@TEST Desktop]: nmtui
1.

2.

3.

ii. nmcli: This is the command line tool.And it looks good, if you remember the commands.

In the above image i have created two connection static and dhcp with nmcli command. To check the connections...
[root@TEST Desktop]: nmcli con show
NAME UUID TYPE DEVICE
eth0 3b2a6a84-ea82-45d1-a173-6674e770c096 802-3-ethernet eno16777736
[root@TEST Desktop]: nmcli con up “static” // To start the static connection //
iii. /etc/sysconfig/network-scripts/ifcfg-eth0: This is the best way to configure ip address with CLI.
[root@TEST Desktop]: vi /etc/sysconfig/network-scripts/ifcfg-eth0
# Generated by dracut initrd
NAME="eth0" // Coonection Name. //
DEVICE="eth0" // Device name used for connection. //
ONBOOT=yes // Start connection during system boot. //
NETBOOT=yes
UUID="caf645dc-68bb-4107-9bf1-ee5fb4f4f495" // Network UUID. //
HWADDR=74:27:ea:a9:27:07 // Network Card MAC address. //
BOOTPROTO=none // Boot Protocol DHCP or STATIC. //
TYPE=Ethernet
DNS1=172.16.120.1 // DNS address. //
DNS2=8.2.2.2 // Second DNS address. //
DEFROUTE=yes
IPV4_FAILURE_FATAL=no
IPADDR=172.16.120.100 // IP address for System. //
PREFIX=22 // Subnet Mask for IP address.//
GATEWAY=172.16.120.65 // Gateway address for Network. //
[root@TEST Desktop]: systemctl restart network
These are the options to configure hostname and network address in Centos 7.
Hostname
Hostname is the name of the system used to communicate with other systems. A fully qualified domain name consists "hostname.domain.name" .
Ex: test.example.com OR prod.oracle.com
You can configure hostname in three ways.
i. nmtui and select Change Hostname
ii. hostnamectl set-hostname NAME
iii. edit file /etc/hosts
i. NMTUI :
Follow the below images.
1.
2.

3.
4.

After system reboot it will show the same hostname at [root@prod singh] in terminal.
ii. hostnamectl
It will show you hostname with system architecture and Virtualization.
[root@TEST Desktop]# hostnamectl status OR hostnamectl
Static hostname: TEST.iitr.pdc
Icon name: computer-desktop
Chassis: desktop
Machine ID: 8c1a8077b3f78bd3bf956a214f3c602c
Boot ID: 831406fb20c34cceaf988188e2e180ab
Virtualization: kvm
Operating System: Oracle Linux Server 7.3
CPE OS Name: cpe:/o:oracle:linux:7:3:server
Kernel: Linux 4.1.12-514.26.2.el7uek.x86_64
Architecture: x86-64
[root@TEST Desktop]# hostnamectl set-hostname TEST2.oracle.com
[root@TEST Desktop]# hostname
test2.oracle.com
[root@TEST Desktop]#
iii. /etc/hosts: To configure hostname edit /etc/hosts file with the following settings...
[root@test2 Desktop]# vi /etc/hosts

If you have not a DNS server for local name resolution then do the entry in this file. It also works for name resolution of other systems.These are the options to change/set hostname. After hostname change must logout or reboot the system.
Network Configuration
For network configuration same as above we have 3 options.
i. nmtui
ii. nmcli
iii. edit /etc/sysconfig/network-scripts/ifcfg-eth0
i. nmtui:
[root@TEST Desktop]: nmtui
1.
2.

3.

ii. nmcli: This is the command line tool.And it looks good, if you remember the commands.

In the above image i have created two connection static and dhcp with nmcli command. To check the connections...
[root@TEST Desktop]: nmcli con show
NAME UUID TYPE DEVICE
eth0 3b2a6a84-ea82-45d1-a173-6674e770c096 802-3-ethernet eno16777736
[root@TEST Desktop]: nmcli con up “static” // To start the static connection //
iii. /etc/sysconfig/network-scripts/ifcfg-eth0: This is the best way to configure ip address with CLI.
[root@TEST Desktop]: vi /etc/sysconfig/network-scripts/ifcfg-eth0
# Generated by dracut initrd
NAME="eth0" // Coonection Name. //
DEVICE="eth0" // Device name used for connection. //
ONBOOT=yes // Start connection during system boot. //
NETBOOT=yes
UUID="caf645dc-68bb-4107-9bf1-ee5fb4f4f495" // Network UUID. //
HWADDR=74:27:ea:a9:27:07 // Network Card MAC address. //
BOOTPROTO=none // Boot Protocol DHCP or STATIC. //
TYPE=Ethernet
DNS1=172.16.120.1 // DNS address. //
DNS2=8.2.2.2 // Second DNS address. //
DEFROUTE=yes
IPV4_FAILURE_FATAL=no
IPADDR=172.16.120.100 // IP address for System. //
PREFIX=22 // Subnet Mask for IP address.//
GATEWAY=172.16.120.65 // Gateway address for Network. //
[root@TEST Desktop]: systemctl restart network
These are the options to configure hostname and network address in Centos 7.
No comments:
Post a Comment